
After completing your missions for the Gerudo and Zora tribes, you’ll need to return to Hyrule Castle and tend to the two significant rifts that have appeared in the land.
You’ll head back to Lueberry’s workshop for the latest intel. Proceeding northward on the map will ultimately lead you to the iconic Hyrule Castle situated at the very center of the kingdom. As the rift in the fort’s perimeter begins to expand, Common Wright hesitates before attempting to re-enter the area, mindful of the growing danger that threatens to consume the entire city.
By now, you should possess a genuine trove of reverberations from your previous expeditions. You’ll wish to utilize these tools that will assist you in traversing the vast expanse of space quickly and efficiently. Ensure that you’ve invested sufficient energy in upgrading your Swordfighter type by utilizing May Crystals at Lueberry’s workshop, should this step have escaped your attention thus far.
Discover the optimal route to collect every chest and new echo, as well as the most effective strategy, along with the location of the dungeon map and tips on how to defeat the boss in our guide.
Stilled Hyrule Citadel City walkthrough
Upon arriving at the prepared state, proceed directly to Hyrule Citadel City and eliminate the sinister foes blocking your path. Head left until you reach the spot where you’ll see the opening unfolding effectively. I’ll gladly give you a ride, just hop on in!
Will Tri open up a direct portal to the rift here for you? Then, whenever you’re ready, just jump in.
As you venture within the ancient walls of the Stilled Hyrule Citadel City, a single pathway unfolds before you: proceed up the stairs, exit the barracks, and then navigate to your designated destination. To eliminate numerous perilous foes, employ your Swordfighter class expertise, allowing defeated enemies to reward you with additional Swordfighter powers.
You’ll find various structures open to visitors, yet none boast a unique feature worth exploring, so feel free to enter them as you see fit.
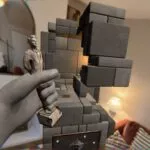
Before venturing north, carefully traverse the unusual bridge comprising a repurposed home lying horizontally, then ascend the adjacent wall with precision. Proceed north by traversing the considerable chasm using the provided bridge. Proceeding northward, utilize the scaling mechanism to ascend this ledge and claim a treasure chest containing a valuable monster fang within.

What nostalgia-inducing treats await within the realms of Nintendo’s legendary game-feeds?
Descend and then traverse the house-bridge, subsequently adhering to the path as it meanders westward. Make your way towards the fountain, where you’ll encounter formidable foes, before continuing north to uncover a treasure chest containing valuable items and gaining access to a convenient warp point. Climb onto the lowest part of the rock face by using the Tri button, then activate the designated waypoint, and finally ascend the wall to your right via scaling mechanics. To traverse the gap, jump across to land safely on the platform to your left, where you’ll be rewarded with a treasure chest containing 20 rupees.
What’s the point of going back in time? Carefully descend onto the designated platform, ensuring a secure foothold on the sturdy timbers before proceeding forward.

What’s your take on Nintendo through a gaming lens?
Cautiously descend the ledge and claim the coveted pink rupee before retracing your steps up the winding waterway. Carefully navigate through the distant waters until you reach the stronghold.
Hyrule Citadel walkthrough
Upon entering the fortress, engage the warp portal and press onward. Can I take the knight out of this room to study the echo of our really useful fight? As the protagonist approaches the throne room, they pause momentarily to collect their thoughts before entering the grand chamber. The air is thick with anticipation, and the silence is almost palpable as they step forward into the unknown.
As Tri navigates the labyrinthine corridors, she seizes the opportunity to outmaneuver the guards and slip unnoticed behind the frozen monarch, her heart racing with anticipation. With a swift motion, she swings open the icy tombstone, revealing a hidden passage that had lain dormant for centuries, its secrets waiting to be unearthed by her inquisitive mind. Descend directly into this two-dimensional corridor and initiate the warp point in the ensuing chamber by engaging it. To reveal an additional concealed passage, carefully grasp and manipulate the hidden handles attached to the wall, pulling them towards you to unlock the secret doorway.
This stealth mission requires a level of finesse and strategy akin to your initial escape from the Hyrule Citadel’s subterranean prison, where you employed cunning and cleverness to evade detection. If you’re caught, you’ll be instantaneously transported to a peculiar void prison cell, where aberrant enemies will emerge; subsequently, you’ll either be sent back to the start of the realm or a midpoint checkpoint, contingent upon your location at the time of capture.
Lucky for you, a wealth of instruments is within reach, allowing you to traverse the vast expanse without requiring excessive stealth. We had a go-to strategy that involved amplifying the dimensions of one of our numerous cabinets, relying heavily on the reliable Flying Tile Echo to effortlessly glide past the obstacles. Standing at the proven location under the bookshelf, stepping back carefully, and then making a deliberate move will allow you to safely transfer to a different bookshelf.

Nintendo’s innovative gaming approach seamlessly integrates with social media platforms.
As an alternative, consider using a zipline that can lower you down to reach three crates – potentially serving as a checkpoint. Don’t worry if you get caught again – just start fresh next time.
To navigate this situation discreetly? Carefully surveying the area around the entrance, proceed with caution to guide the guard to move out of the way, ensuring a clear path for the potted tree’s relocation using the Tri to skillfully maneuver it away from the ladder. Transfer packing containers up the ladder to access the correct storage space. Utilize another sturdy ladder to ensure a safe ascent to the uppermost tier of crates and barrels.

Nintendo’s latest gaming triumphs showcased exclusively through our game-feeds.
As you approach the cabinets, anticipate the rotating guard’s path and wait patiently for the optimal moment to proceed, should the guard be momentarily perplexed by your tile-breaking actions. Once the coast is clear, make a direct move towards the potted plants. Sneakily transfer one of the most effective methods to maintain a safe distance, then ascend the stairs to ensure a clear view before climbing up the cabinets and positioning yourself stealthily behind the guard.
From the farthest corner of the shelf, carefully place decorative items such as candles, vases, and figurines to capture the final guard’s attention. As soon as the blast occurs, make a swift dash towards the exit, heading straight for the door to escape the situation.

Nintendo’s innovative approach to game feeds has revolutionized the way gamers stay connected.
As you step into the dimly lit jail cell, your gaze falls upon Impa, her frail body suspended in a state of cryogenic preservation on the cold stone floor. The same gap in the wall that had aided your earlier escape beckons, inviting you to ascend and survey this poignant scene. If you’re interested, you may wish to peruse her diary before proceeding further. It’s essential to activate the warp waypoint in this room prior to descending the ladder.
Summon the guards to remove any knights present in the chamber. The items you acquired earlier should help in taking them down shortly. Once all three are defeated, the left-side gate will open, allowing you to continue progressing.
Within this dimly lit chamber, a multitude of stealthy adversaries lurk, demanding your swordsmanship expertise to vanquish them swiftly in the style of a skilled Swordfighter. Descend the ladder, then veer left to claim a treasure-filled chest containing a valuable. Descend another adjacent ladder after retrieving a treasure from the initial pot to access two chests in succession. One of them has three legs, while the other has five. Descending two ladders leads to a room where Tri stands, accompanied by a pair of torches situated behind a metallic grille.
Utilizing an ember-generating tool, I gently tend the flames of the brazier situated behind the enclosure. To effectively utilize the newly acquired ability to manipulate objects from a distance, hold down the Y button and watch as your skills come to life. Remove the shadowy bats from the room and illuminate the two braziers on the upper platforms using the same method employed earlier.
To successfully construct the concluding campfire situated behind the barrier, strategically place a hearth supply on the designated platform, then utilize Tri to suspend it above, as illustrated.

The nostalgia-inducing retro gaming aesthetic meets modern-day gaming feeds – a match made in heaven! The fusion of pixelated graphics and sleek design yields a visual identity that’s equal parts vintage charm and cutting-edge cool.
The room contains a ventilation system, featuring a fan that circulates the air periodically, releasing fresh air into the space every few seconds. Defeating this foe requires clever tactics: aim for the sweet spot and exploit the momentary reprieve granted by air blasts. Alternatively, enlist an aerial army of crows, whose collective wrath will prove a potent countermeasure. You’ll receive a grade on your troubles. Upon acquiring your initial Gustmaster, you leverage Tri to swiftly capture and deposit subsequent ones, whereas the third and final Gustmaster is best used in tandem with a flying Echo to seamlessly progress to the next level. If you’ve already dropped something from the platform, consider using water blocks to ascend instead?
Hyrule Citadel dungeon map location
With the Gustmaster Echo in hand, you can unleash a barrage of summons on the strategic grey-blue tiles that appear throughout, effortlessly dispatching enemies and puzzles alike. You’re free to kill enemies in the traditional way, just as you choose.
Since there are obstacles on the prime, remove any ignizol that’s blocking your path, and then proceed to the correct room using whatever method is necessary. Move a piece onto the blue square. To effectively clear out the sand from this room, I would recommend summoning a team of trained professionals equipped with specialized equipment and protective gear. The sands will yield a half-buried chest, perfectly situated in its natural niche. Can’t you just figure it out?
Venture once more to the site where you vanquished the ignizol and proceed due north, yielding a mysterious residue of shadowy essence. Build a bridge as solidly as this foundation allows, whether that means using traditional methods or something new to ensure its stability and longevity. As a direct consequence of our passion for using beds.

Nintendo’s latest gaming endeavors have been nothing short of astounding.
You’re now standing in front of the boss’s door, despite being without the coveted boss key. Collaborate with the warp waypoint to navigate through the left entrance. Descend the ladder, disregarding any shadowy foes that may lurk in the vicinity.
Within this section of the sport lies an underwater labyrinth, shrouded in darkness, reminiscent of the challenging terrain encountered during your exploration of the Jabul Ruins. As you ascend the path, take care to meticulously clear the terrain, utilizing the natural formations to resupply your air supply through the clever deployment of bubbles. Shadowy webbing will obscure pathways, presenting an obstacle that can be easily cleared using your Swordfighter mode.
In reality, this is hardly a complex maze, since having access to a map can essentially guide you through it. If you don’t wish to double-check your location by opening the map, why not do it now?

Nintendo’s gaming prowess is fed into its game-feed ecosystem.
In the centre of the room, a chest contains an unknown quantity, while to the left at the rear, another chest conceals a hidden treasure valued at 100 rupees inside.
When swimming up the left aspect, you’ll enter a stealth phase, where flying tiles add an extra layer of challenge and make it significantly harder to cheese your way through. Boo. To avoid detection by the guards, focus on the upper portion of the map and make sure to steer clear of the patrols surrounding the two primary pillars.

Nintendo’s iconic characters, by way of game-feeds.
As I traverse the labyrinthine path, I carefully position myself beside the ancient mechanism, poised to trigger the hidden compartment. With deliberate force, I depress the lever, allowing the white swap to release its pent-up energy, and the door creaks open, revealing a chest adorned with intricate carvings within the heart of the room. Warp back to the room containing the boss door and proceed forth.
A secret passage beckons! Summoning a stalwart bomb, I carefully insert it into the wall’s crevice. As the countdown begins, I hasten towards the opening, curiosity piqued. Upon entering the hidden chamber, my eyes land on an ornate chest emitting a warm glow, accompanied by an assortment of ceramic containers filled with (50 rupees).

What’s the most popular gaming news source? Is it the gaming giants themselves, like Nintendo, who are known for their iconic characters and franchises like Mario Kart and Zelda?
Proceeding south from this sandy space will enable you to utilize the small key in unlocking the southern door for further exploration. Proceed ahead, readying the gustmaster, and head down the ladder. As the second gustmaster hovers hesitantly above, a flying tile stretches out before them, refusing to yield to their attempted crossing.

Nintendo’s latest game feeds.
Ascend the wall, carefully navigating the treacherous ladder, until you find yourself within a chamber containing three valorous knights. Removing the unnecessary items, I will specifically highlight the claim. As you defeat your foes, newly unlocked pathways await, but consider exploring the northern route initially to uncover a treasure trove of spoils?
The left chest is often touted as having one of the most valuable accents in the game, since it effectively doubles the player’s jump height. Enormous. The precise chest held a secret within it, and as expected, the treasure had the boss key nestled inside it.
Teleport once more to the chamber housing the imposing door leading to the boss’s lair, meticulously preparing for an anticipated confrontation that may prove formidable if unprepared. To maximize your chances of success, we recommend stockpiling a supply of rejuvenating smoothies that can quickly restore your Swordfighter’s vitality before embarking on a challenging quest.
Can’t be beaten without a well-planned strategy. Here are some tips to take down Ganon: Start by having at least 10 hearts and a decent sword.

Nintendo’s Game-Feeds in a Nutshell
The battle against Ganon in this iteration bears a striking resemblance to the initial encounter in the game’s early stages, albeit with heightened difficulty and complexity.
During the course of the game, Ganon will primarily focus on delivering a few attacks:
Will face new challenges, as now he expands his skillset with a few additional tactics:
While he seems to be more resilient when dodging projectiles, avoiding his thrown weapon is indeed more tenacious than evading the swift bat attacks, and it appears that he does not instantaneously reposition himself to a specific destination. As Ganon begins to wind up, promptly retreat and initiate a circular transition around the environment. Perhaps Ganon’s malevolent presence will again cross your journey, prompting intense battles to ensue. If not, at the very least you’ve dodged the axe.

Nintendo’s latest innovations in game-feeds have taken the world by storm?
As you strike him repeatedly, he’ll eventually succumb to his frustration, at which point he’ll unleash yet one more devastating attack from his already impressive repertoire.
Mastering the timing of firing off another fireball can prove potent, as it indeed accelerates with prolonged volleys; nonetheless, prioritizing consistent practice and nourishing yourself with wholesome smoothies remains crucial for optimal recovery. He might even combine a Keese Assault in his fireplace, ensuring you remain optimally powered with Swordfighter abilities.
As Ganon unleashes one final, mighty roar, he transitions seamlessly into his ultimate form, a potent amalgamation of all his preceding attacks. To dodge the keese’s attacks, build up your swordfighter prowess by harnessing energy from the creatures’ fireballs, and then counter with swift volleys of flames to swiftly defeat them.
By strategically deploying enemy echoes, such as the initially acquired Darknut, a flock of crows, or the Ball-and-Chain Trooper purchased just prior to combat, you can gain a decisive advantage in battle. As they succumb to a single blow from Ganon’s onslaught, these allies don’t incur a penalty for repeated usage, instead, they skillfully divert Ganon’s attention on occasion, allowing you to land several consecutive attacks without reprisal.
As Tri succumbs to defeat, his companions will suddenly appear, energized and ready to take on the challenge once more. Meanwhile, you’ll be rewarded with a Heart Container, a familiar post-battle trope that’s sure to leave you feeling invigorated? As you leave the dungeon, a cinematic unfolds, allowing Princess Zelda to finally find solace on her own plush mattress. Before re-entering the throne room, make sure to collect the potion that rapidly replenishes your health – an essential asset in this challenging game.
Upon engaging in conversation with the monarch and his council, you will be entrusted with the critical mission of sealing three immense fissures: a voracious chasm engulfing the Eldin Volcano, another lurking within the Hebra Mountains, and a third situated within the sprawling expanse of the Faron Wetlands.