The Sundered Doctrine dungeon takes Future 2 gamers again to Rhulk’s Pyramid for extra monsters, extra riddles, and most significantly, extra loot.
Veterans of the Vow of the Disciple raid will recognise the mechanics right here, albeit with some new twists.
Sundered Doctrine is on the shorter facet so far as dungeons go, with simply three encounters and two not-so-tough boss fights. Offered you may get your head round memorising all these symbols, you shouldn’t have any drawback finishing Sundered Doctrine — and for those who’re fortunate, obtain the Finality’s Auger unique fusion rifle whilst you’re at it.
Find out how to begin Sundered Doctrine

Picture: Bungie through game-feeds
Earlier than we start, there’s a little bit of admin to deal with first. To start out Sundered Doctrine, you’ll first want to talk to Ikora within the Tower. She offers you a quest, “The Drowning Labyrinth” which unlocks entry to the dungeon. Now, you simply want to go to the Savathun’s Throne World part of the map, and discover the Sundered Doctrine node within the prime left, beside the Vow of the Disciple raid.
When you load in, you’ll have a little bit of a trek to get to the primary encounter. Proceed ahead and also you’ll come to a big hole, with a bridge crossing it to your left. Take the bridge throughout, then soar as much as the ledge on the left. Take the primary proper and drop down; you’ll enter a collection of rooms with enemies to cope with.

Picture: Bungie through game-feeds
Take out the Attendants and the Subjugators, then proceed ahead. Within the back-left nook of the second hall, you’ll spot a big rectangle jutting out from the wall at a wierd angle. Leap on it, and it’ll decrease down, permitting you to cross by way of.
You’ll now be in a good area with a number of methods to drop down. There’s nothing untoward right here — you merely must make your manner right down to the underside. You’ll then emerge into a big, cross-shaped room with enemies to take out. When you clear the best way, search for a small waterfall. From the place you enter, go straight forward and also you’ll discover it on the best facet.
Go underneath the waterfall, and comply with the trail right down to the primary correct encounter of the dungeon.
First Encounter, Flooded Inspection

Picture: Bungie through game-feeds
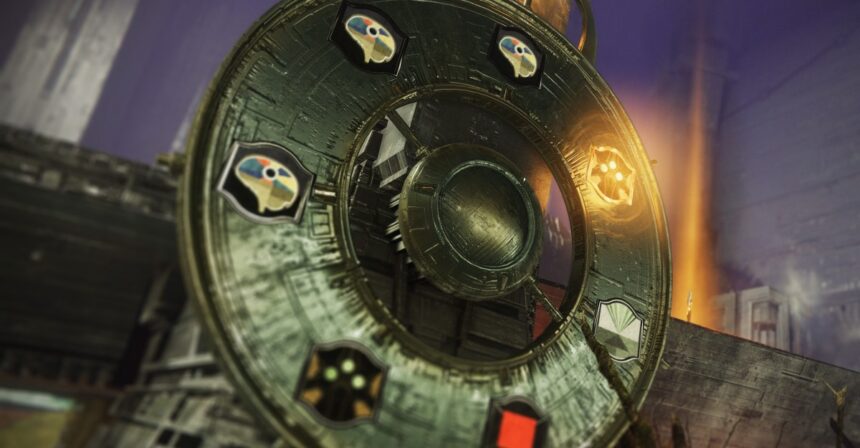
This primary encounter primarily consists of two issues: memorising symbols and directing mild beams. You’ll start by coming into the central chamber, with three lenses within the centre and a logo wheel above the again of the room. There are three image slots on the wheel, however one is empty. The target is to discover the lacking image and join a lightweight beam to it.
The format and the way it works

Picture: Bungie through game-feeds
Let’s begin breaking this down. There are 4 rooms across the central chamber. Two on the left, and two on the best. Every room has its personal image wheel, and every wheel has only one image on it. To find out which image you want, you’ll must find the Truthspeaker.
In simply one of many 4 rooms, a Grim labelled the Truthspeaker will spawn. Once you kill it, it should drop a logo, that’s the image you might want to hyperlink the sunshine beam to.
The next step is to find the proper image. Will probably be on one of many wheels in one of many 4 rooms. As soon as you discover it, you’ll must hyperlink the sunshine from the central room to the wheel. To take action, you’ll first must shoot the shard above one of many three lenses within the central room to make it produce a beam of sunshine.
You then must create a sequence of sunshine by way of numerous lenses from right here to the proper image wheel. The three within the central room are able to go, however lots of the different lenses are lacking.
Every of the 4 rooms will spawn a Lens Bearer Subjugator. Kill one, and it’ll drop a lens which you could decide up. Deliver the lens to one of many empty slots across the encounter space and you may place it there. As soon as positioned, a lens could be rotated to 1 of some predetermined angles. You’ll be able to take a look at the bottom of the lens to see which instructions the sunshine can go.

Picture: Bungie through game-feeds
This may occasionally appear to be so much in writing, however it’s fairly easy in observe. The order of operations goes like this:
- Search every room for a Truthspeaker to seek out your lacking image
- Find the image on one of many 4 wheels
- Observe the trail from that wheel again to the central room, noting which lenses are lacking alongside the best way
- Activate the closest mild within the central room, then seize lenses from the Lens Bearers as wanted
- Create a sequence of sunshine that hyperlinks the central room to the proper wheel
When you create the proper chain, you’ll get a notification that claims “The Pyramid accepts a reality”, which means you’ve gotten accomplished the target. After you full the primary chain, return to the central room and also you’ll see that two symbols at the moment are lacking from the wheel. For the second spherical, you’ll must hyperlink two symbols.
The strategy is equivalent; discover the Truthspeaker to get your image, seize lenses from Lens Bearers, and make the chain. When you full the primary one, a second Truthspeaker will spawn to offer you your second image. Repeat the method, and after you have the 2 symbols linked, the second spherical is full.
This may occasionally come as a shock, however for the third spherical, you’ll must hyperlink three symbols. No modifications right here, simply repeat the steps you’ve gotten been following up to now. In complete, you’ll should make six hyperlinks to finish this encounter.
Sundered Doctrine maze route

Picture: Bungie through game-feeds
With the primary encounter accomplished, a door will open within the central room, resulting in the following encounter. Sadly, there’s a little bit of a maze and a few traps forward that will give Indiana Jones a run for his cash. Whereas it may be simple to get rotated within the maze, fortunately you possibly can’t get too misplaced.
Once you undergo the door, you’ll instantly come to some stairs resulting in a locked door. Drop off both facet of the steps, and make your manner right down to the underside. Proceed ahead, and also you’ll come to a gap, and drop down once more. This brings you into the small maze.
On the first junction, flip proper and go straight to the top. Drop down, then look to your proper. Take the primary left down this hall, go up the steps and comply with this path to exit the maze.

Picture: Bungie through game-feeds
The subsequent half is a large open space with some enemies to cope with. No methods right here, simply make your well past the enemies and cross the bridge to the best. By way of right here, you’ll discover a lengthy and darkish hallway. Go down it, however cease on the second exit on the left, you’ll discover one other gap to drop down by way of.

Picture: Bungie through game-feeds
This may carry you to a protracted room with a pit operating by way of the center. Keep on the facet you enter on, stroll to the far finish, and look throughout and down. You’ll see a small opening under the other ledge. Stroll by way of this small passageway and emerge into what appears to be an historic Peruvian temple, with fewer golden idols and extra boulders.
The boulder part is pretty easy, you merely want to make use of the secure areas on both facet to keep away from the large ball of spikes rolling in direction of you. You don’t must go all the best way up the hill both — there’s a gap about midway up it, and that’s your manner ahead. By way of right here, you simply must keep away from some crisscrossing boulders and make your manner right down to the door to the second encounter.
Second Encounter, Altered Convolution and Zoetic Lockset
The second encounter has two components — opening the door, and the Zoetic Lockset.

Picture: Bungie through game-feeds
The door into the second encounter of Sundered Doctrine is a small take a look at, set to show you the mechanics you might want to know. You’ll enter a room with image wheels on both facet, enemies all through, and a door forward with a logo on both facet of it. That you must spotlight these symbols on every of the wheels so as to open the door.
To do that, take down one of many Perceptor Wizards and seize the merchandise it drops. This offers you Heightened Data, which you need to use to maneuver the spotlight on the image wheel one area. You’ll be able to transfer it clockwise or counterclockwise, relying on which manner the interior wheel is spinning. To vary the rotation, merely shoot the shard above the wheel.
You’ll be able to collect extra data from the Perceptors, as much as three directly. That is all very related for the encounter forward, so be sure to familiarize yourself with this technique.
- As talked about, a single stack provides you Heightened Data, which strikes the image one area.
- Two stacks provides you Brimming Data, which can transfer the image two areas.
- Lastly, Overflowing Data will transfer it three areas.
When you spotlight the proper symbols, the door forward will open. Undergo it to enter the second encounter room. Right here you’ll discover the Zoetic Lockset, a gaggle of 4 Hive Shriekers alongside the again of the room. There are 4 clean indicators in entrance of them, and 4 image wheels all through the room.
Defeating the Zoetic Lockset

Picture: Bungie through game-feeds
This encounter is extra artwork than science, as there isn’t any inflexible methodology for finishing it. Put merely, the highlighted symbols on every of the wheels trigger totally different, particular results. The Zoetic Lockset will cycle by way of these results all through the combat, and you might want to use this to your benefit. From our testing and analysis, the symbols seem to have the next results:
- Hive – Spawns Ogres
- Data – Spawns Knights
- Commune – Shriekers launch Darkness seekers
- Cease – Briefly prevents enemies from spawning
- Kill – Start the harm section
It goes with out saying, Kill is the image we need to concentrate on. Nonetheless, there’s an order to this, and leaping the queue can have disagreeable penalties. The Shriekers cycle their consideration from proper to left, which is why you’ll hear many Guardians referring to the boss, the indicators, and the wheels as one to 4, and from proper to left.

Picture: Bungie through game-feeds
There are numerous methods you possibly can make use of right here, however usually, the best path ahead is to set the symbols within the following order:
Doing this offers you as a lot respiratory room as doable, and having Kill within the remaining slot (the one on the far left) appears to grant essentially the most time for the harm section. Doing harm is kind of easy, you possibly can assault any of the 4 Shriekers and so they can’t be killed individually, so decide a goal and focus all of your fireplace there. A very good technique for avoiding harm is to hold again close to the steps on the centre of the room, which you need to use for canopy.
Because the Zoetic Lockset are a gaggle of Shriekers, precision harm is your greatest good friend. Sleeper Simulant, Queenbreaker’s Bow, or your different favorite Linear Fusion Rifle will chew this boss up briefly order. Collect your group collectively, focus your photographs on the crucial spot of one of many bosses, and chip away at it till it dies.
Reaching the ultimate encounter

Picture: Bungie through game-feeds
As soon as the Zoetic Lockset is defeated, you’ll must open the exit door. Simply in entrance of the loot chest, you’ll discover a concave bowl within the flooring. As you probably know, when Shriekers die, the spherical core drops to the bottom and makes for a fairly respectable soccer.
You’ll must go the good distance as there are limitations on both facet of the outlet, so carry one of many balls to the again of the room, then coax it throughout the bridge. It ought to fall properly into the dish, which can open the door to the following encounter.

Picture: Bungie through game-feeds
The journey right here is simpler, it is best to have little subject discovering your manner ahead. Earlier than lengthy, you’ll come to the skeletal stays of an enormous Hive worm. Undergo the ribcage tunnel to enter a room with one other mild puzzle. If you happen to made it by way of the primary encounter, this half isn’t going to cease you.
You’ll discover the sources of each lights on one facet of the room, beside the symbols for Enter and Worm. Merely bounce the beams to the matching symbols on the opposite facet of the room to decrease the barrier and proceed to the ultimate encounter.
There may be one final hurdle, as you end up in a room with a sealed door. There isn’t any mechanism to open it, you merely should shoot the door. How a lot it opens is straight related to how a lot harm you do, so hit it with one thing moderately highly effective to open it absolutely and stroll by way of to the boss room.
Closing encounter, Isolate Preservation and Kerrev, The Erased

Picture: Bungie through game-feeds
Our final process within the Sundered Doctrine dungeon is to take down Kerrev, The Erased. The ultimate boss room consists of a big central room, with facet rooms on the left and proper. Kerrev has an invincible defend, which we might want to use the mechanics to carry down. We’re again to utilizing mild beams to light up particular symbols like the primary encounter, however there is a little more brainwork concerned this time.
Behind the central room, you’ll discover a image wheel. There are six symbols on it, three on the left and three on the best. The very first thing it is best to do is be aware of these symbols. Take a screenshot, take an image along with your telephone, whichever is essentially the most handy so that you can reference again to.

Picture: Bungie through game-feeds
Subsequent, you might want to discover the Truthspeaker. They will spawn in both of the 2 facet rooms, so do a fast search of each. To enter the room on the best, soar onto the oblong construction that stands proud of the wall at an angle (very similar to the one on the very begin of the dungeon). Standing on it should decrease it, and you may stroll by way of. You can’t use this to return to the central room, you might want to undergo the small tunnel additional alongside the connecting wall.
The left room is much less convoluted, however the door needs to be broken to open, just like the door that acquired you into this encounter. Test each rooms and defeat the Truthspeaker to get a logo. It is going to match one of many symbols on the wheel.
Mild up the proper symbols

Picture: Bungie through game-feeds
That is the essential factor to recollect, whichever facet of the wheel the Truthspeaker image is on, you have to darken the symbols on that facet, and illuminate the symbols on the other facet. If the image is on the best facet, you might want to change off any lights on the best facet, and activate any lights that aren’t lit up on the left.
The way you do that is fairly simple — every of the symbols could be present in one of many three rooms, with a lens close by that you need to use. Right here is the place you could find every of the symbols, relative to the place you begin:
- Witness – Far-left nook
- Hive – Far-right nook
- Guardian – Straight proper as you enter the room
- Pyramid – Forward and to the left as you enter
- Traveller – Again-right nook
- Worship – Again-left nook
- Kill – Again-right nook
- Cease – Downstairs, underneath the place the boss stands
- Give – Downstairs
- Drink – Far-right nook
- Mild – Again of the room
- Darkness – Centre of the room
- Worm – Far-left nook
- Savathûn – Far-right nook
Be aware of which symbols you might want to activate, and which of them you might want to flip off. Then, go to these symbols and work together with the corresponding lens as wanted. Most of the lenses will likely be locked down with Strand vitality, for these you might want to take out Unwritten Attendants to achieve the Unwritten Empowerment buff, which lets you destroy the Strand locks. Watch out, as each you destroy will spawn a very nasty Threadling.

Picture: Bungie through game-feeds
After getting the proper symbols switched on or off, work together with the primary image wheel within the central room to enter your reply. As quickly as you do, run for canopy. This triggers a large burning impact which can shortly kill you if you’re out within the open. Use the shadows of the constructions within the room to discover a secure area, and wait till the burning dissipates.
In case your symbols are lit up appropriately, the boss’ defend can have burned away, and you can begin dealing harm. Kerrev is a squirrelly buyer, so that you’ll must sustain as he strikes across the room. A good way to maximise your harm right here is to make use of Divinity with a few Linear Fusion Rifles or Machine Weapons for enormous crucial harm.
You’ll solely have a short time to deal harm earlier than Kerrev’s defend regenerates. When that occurs, repeat the steps precisely as you probably did earlier than to set off one other harm section. Repeat the method till Kerrev is useless, and the Sundered Doctrine dungeon is full.
Fingers crossed you had been rewarded the dungeon’s unique, Finality’s Auger — but when not, the earlier hyperlink delves into methods you possibly can enhance your drop charge.