How do you put in a CPU? Whereas your graphics card is undoubtedly the principle driver relating to gaming, it’s additionally important to improve your CPU at times. With increased clock speeds, in addition to new options resembling AMD 3D V-cache, a CPU improve can preserve your GPU fed with body information at a quicker price than your previous chip, stopping bottlenecks in your rig. What’s extra, it is a comparatively simple improve, so long as you arm your self with persistence, time, and area to work. On this information, we’ll take you thru the entire strategy of upgrading your CPU.
In our checks, we’ve discovered that you just don’t want greater than eight cores for gaming, so there’s no have to splash a foolish sum of money on a 16-core or 24-core monster CPU in case your principal precedence is gaming. As an alternative, we suggest shopping for a six-core or eight-core chip with a quick clock pace should you’re upgrading an Intel system, or with 3D V-cache should you’re upgrading an AMD rig. You may take a look at our information to the most effective gaming CPU to seek out the chip that most closely fits your wants.
The way to improve a CPU
- Preparation
- Earth your self
- Take away your CPU cooler
- Clear off thermal paste
- Take away your previous CPU
- Set up new CPU
- Apply thermal paste
- Refit CPU cooler
- Check your new CPU
1. Preparation
There’s an enormous selection of CPUs accessible from each Intel and AMD nowadays, and your first job is to seek out out in case your chosen CPU improve is appropriate together with your present motherboard, or whether or not you’ll want a brand new one. In case you plan to purchase a brand new motherboard, we presently suggest going with one based mostly on AMD’s newest X870-series chipsets and shopping for a brand new Ryzen X3D CPU with 3D V-cache. These chips have an enormous additional cache chip on them, and in our checks, we’ve discovered that this additional cache offers a major increase to gaming efficiency.
You probably have a Socket AM4 motherboard, with any AMD Ryzen 1000, 2000, 3000, or 5000-series CPU, there’s additionally likelihood you’ll be capable of flash your BIOS (the firmware in your motherboard) and set up a brand new CPU with 3D V-cache, such because the Ryzen 7 5700X3D. Test the producer’s webpage to your precise mannequin of motherboard, and discover the most recent BIOS on the assist/downloads web page to see if there’s a brand new replace for it, then learn our information on flash your BIOS to see the way it’s finished.
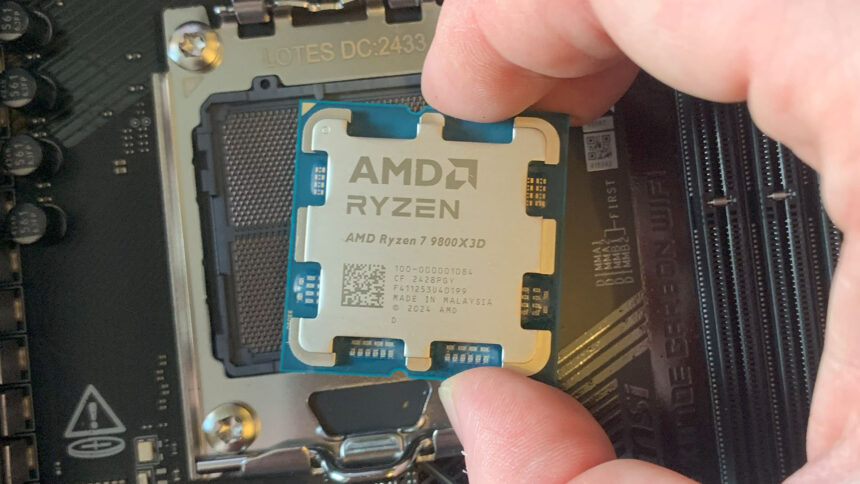
Nevertheless, you’ll want a brand new Socket AM5 motherboard if you wish to set up a Ryzen 9000-series CPU, and also you’ll additionally want some DDR5 reminiscence for it too. Learn our Ryzen 7 9800X3D evaluate to see why we suggest this chip as the best choice for this platform, and take a look at our information to the most effective gaming RAM to see which reminiscence will finest fit your new system.
Likewise, you’ll want DDR5 reminiscence and a brand new LGA1851 motherboard if you wish to improve to one in all Intel’s new Arrow Lake CPUs, which we examined in our Core Extremely 7 265K evaluate. Nevertheless, it’s best to be capable of improve any Twelfth-gen (12000-series) or Thirteenth-gen (13000-series) Intel system to one in all Intel’s 14th-gen Raptor Lake CPUs, that are higher choices for gaming than Intel’s new Core Extremely CPUs. You have to to replace your motherboard to the very newest BIOS first, although, not solely to acknowledge the brand new CPU, but additionally to replace it to the very newest microcode and keep away from the steadiness points that plagued these CPUs in 2023.
Lastly, you’ll have to be sure to have the most effective CPU cooler for the job. Your present cooler could nicely have sufficient cooling capability, however it could want an adapter package to suit the most recent CPU socket mounts – this data ought to be accessible on the producer’s web site. If a package is out there, it is going to solely price a couple of dollars and can allow you to make use of your previous cooler together with your new chip.
You additionally have to ensure that your cooler will deal with the warmth load out of your new CPU. Search for the ‘TDP’ determine within the specs of your chosen CPU – this stands for thermal design energy, and it exhibits the everyday thermal wattage anticipated to be output by your CPU beneath load. You may then take a look at the specs lists for CPU coolers and see which of them have sufficient cooling energy to tame the warmth out of your new CPU. You can even take a look at our information to the most effective AIO cooler should you
After you have your most popular chip in hand and the most effective gaming motherboard for the job, it’s time to get to work getting ready your rig. Fortunately, upgrading CPUs is extremely easy and comparatively fast relying in your setup.
Right here’s what you want:
- Philips Sort 2 screwdriver
- Mini screwdriver set
- Tube of thermal paste
- TIM cleaner or Isopropyl alcohol
- Antistatic, lint-free material
- Flat, clutter-free floor
2. Earth your self
When you can typically get away with out taking antistatic precautions once you’re upgrading your CPU, we suggest taking precautions simply in case. In any case, there’s a purpose why your components are shipped inside anti-static luggage and only one mistake can flip your new CPU into an costly (to not point out ineffective) paperweight.
For a begin, flip off your PC on the wall and unplug your energy provide earlier than tampering together with your PC’s innards, after which take the next steps earlier than making an attempt to take away your present CPU:
- Press the ability button as soon as after you’ve unplugged the ability provide to flush out any residual energy.
- Place your desktop on a tough floor, resembling wooden, and keep away from putting it on carpets or blankets – in spite of everything, you don’t wish to encourage static electrical energy to construct up.
- Both stand on a tough floor in naked ft, resembling tile, or put on footwear with rubber soles should you should stand on a carpet.
- Cotton clothes is your finest good friend, when you ought to keep away from sporting wool and a few artificial materials that would conduct static.
Even should you’ve ticked off all these steps, it’s finest to floor your self in order that the static discharge is pushed away out of your elements. That is simply achieved by sporting and attaching an antistatic wristband to a metallic a part of the case.
Alternatively, you may contact an unpainted metallic portion of your PC case each couple of minutes to earth your self reduce the chance. That is my ordinary method if I’m in a rush, and it’s the chosen route of {most professional} PC builders too, however a small likelihood of discharge stays with this methodology.

3. Take away your CPU cooler
It’s now time clear your path to your CPU socket. When you’ve eliminated the aspect panel out of your PC case, your subsequent job is to detach your CPU cooler, which can be hooked up by a few completely different strategies. You probably have an air cooler, begin by unplugging its energy cable out of your motherboard, so there’s no resistance once you take off the cooler.
You probably have an air cooler that makes use of the inventory plastic mounts on an AMD motherboard, there might be a latch mechanism to unhook it, the place you may push down the latch on one aspect of the CPU to loosen the clamp, after which unhook that aspect of the cooler from the mount. You’ll then be capable of unhook the opposite aspect.
As soon as either side are unhooked, wiggle the cooler gently in slight rotations backwards and forwards to loosen the thermal paste – finally, you’ll be capable of work it free and carry it up – don’t be tempted to yank it upward straightway, otherwise you threat damaging your CPU, notably if it’s a Socket AM4 CPU, which might be pulled straight out of the socket with injury to the pins should you’re not cautious.

You probably have an Intel inventory cooler, will probably be surrounded by 4 plastic circles, every of which corresponds to a pin on the cooler and a gap within the motherboard. Push down on the circle together with your thumb, and switch it to loosen the clamping mechanism – it is going to both flip clockwise or anti-clockwise – the circle will then pop up when it’s unlatched. Repeat this course of for all 4 pins, after which rigorously jiggle the cooler gently in slight rotations backwards and forwards – it will loosen the thermal paste and finally allow you to carry the cooler off your CPU.
Lastly, if in case you have an AIO cooler, begin by assessing the cables hooked up to the pump unit – the block that’s sitting instantly on prime of your CPU. It’s best to be capable of take away this unit with out eradicating the radiator out of your PC case as nicely, however take take a look at all of the cables and the place they connect to the pump unit first – ensure that, once you take away the pump unit, there might be sufficient slack within the cables and tubing to maintain it out the way in which of your motherboard.
If doubtful, it’s typically finest to only take away the entire AIO cooler, radiator and all. Begin by ensuring all of the followers are unplugged from their energy sockets, and take away any cable ties securing them to the again of the case, then unscrew the radiator out of your case utilizing your Sort 2 Philips screwdriver. While you get to the final two screws, maintain the radiator with one hand to ensure it doesn’t drop onto your motherboard once you take away the final screw, then put the radiator and followers safely out of the way in which by the aspect of your motherboard.

While you’re assured you may safely take away your AIO cooler’s pump unit, or should you’re utilizing an air cooler that makes use of a customized backplate, it is going to often be secured in place by 4 thumbscrews, which might be eliminated together with your Philips Sort 2 screwdriver. Unscrew all of them a bit at first to loosen the clamp, then totally unscrew each individually and put them someplace secure for later.
You’ll now be capable of take away the pump unit or air cooler out of your CPU, however don’t instantly pull it up, otherwise you threat damaging your CPU and motherboard socket. As an alternative, gently wiggle it backwards and forwards, backward and forward, to loosen the thermal paste, earlier than you carry it up. In case you’re eradicating an AIO pump unit, now’s the time to be additional cautious and make completely certain that this heavy block with its metallic mounting plates doesn’t get dropped in your motherboard – transfer it securely out of the way in which.

4. Clear off previous thermal paste
You’ll now be offered with a gooey mess on each your CPU and your cooler’s contact plate, and this must be completely cleaned earlier than you do the rest.
You’ll want some TIM (thermal interface materials) cleaner or isopropyl alcohol for this job, in addition to a lint-free material. I’ve all the time used ArctiClean for this job, and have discovered it really works rather well. It is available in two bottles, one to wash off the thermal paste, and one to re-prep the floor, nevertheless it’s the previous that’s most essential.

Put a couple of drops of your cleansing resolution on the material, after which wipe off all of the thermal paste out of your CPU cooler, ensuring you take away each final little bit of it. It’ll take a couple of wipes, however you’ll finally be capable of see your cooler’s shiny contact plate once more.

Your subsequent job is to wash the CPU, and I like to recommend leaving it in its socket for this job, because it retains grip in your CPU and lessens the prospect of you wiping thermal paste onto the pins or contact plates of your CPUs, whereas additionally stopping you from getting thermal paste throughout your fingers.

Once more, put a couple of drops of your cleansing resolution in your material – utilizing both a special space of the material than earlier than or, ideally, a brand new material, and gently (however completely) wipe all of the thermal paste off your CPU’s metallic heatspreader, and off the metallic protecting across the motherboard socket, being cautious to not get any on the motherboard. As soon as you may see your entire CPU’s heatspreader once more, and clearly learn all of the textual content on it, then you definitely’re prepared for the subsequent stage.

5. Take away previous CPU
All CPU sockets, whether or not they’re utilized by Intel or AMD, depend on a latch mechanism to safe the CPU within the socket, and also you’ll discover a deal with subsequent to your CPU socket. You probably have a Socket AM4 CPU, then this job is simple – gently transfer the lever barely to the aspect, after which carry it up.

This can loosen the socket’s grip on the CPU, and also you’ll be capable of carry it out of the socket. Take care right here, being light, as you completely don’t wish to find yourself bending any of the pins on the CPU. When you’ve eliminated your chip, clear off any final remaining thermal paste and put it again in its field for safekeeping. In case you don’t nonetheless have the field, put it someplace secure, safe, and agency, the place there’s no likelihood of damaging the pins.
You probably have an Intel LGA1700 or LGA1851 CPU, or an AMD Socket AM5 CPU, then these use land grid arrays (that’s what LGA stands for) of pins, reasonably than having holes within the sockets. You completely don’t wish to find yourself damaging or bending one in all these pins, so take additional care with this a part of the method.

Push down the deal with subsequent to the socket, then push it to the aspect and it’ll carry up, loosening the metallic plate on prime of the CPU. You may then gently flip up this metallic plate, and be sure to’ve eliminated each final little bit of thermal paste from the highest and backside of it. You’ll then be capable of rigorously carry your CPU out of the socket – grip it firmly by either side, then gently carry it up and out of the way in which. No matter you do, don’t be tempted to the touch the socket, as you don’t wish to threat damaging it.
Clear off any final bits of thermal paste out of your CPU if there’s any left, after which put it again in its field, or a secure and safe various place. Thermal paste typically will get caught within the crevices of the heatspreaders on Socket AM5 CPUs, so attempt to get all of it eliminated earlier than you progress to the subsequent stage.

6. Set up new CPU
Now comes the thrilling bit, the place you get to put in your new CPU. You probably have an Intel CPU, or a brand new Socket AM5 CPU, then take it out of its field now, and maintain it rigorously on the edges. Have a look at the the form of the socket in your motherboard, and the positions of the little notches on the edges of it, and also you’ll be capable of see how your CPU suits into it.
Someplace in your CPU you’ll additionally discover a gold triangle, which denotes the place of pin 1 in your processor – the triangle is far larger on AMD CPUs than on Intel ones, however will probably be there someplace. There might be a corresponding triangle form within the CPU socket as nicely, and also you simply have to ensure that the triangle in your CPU is true subsequent to the triangle on the motherboard socket – your CPU will then undoubtedly be the correct means spherical to suit into the socket.

You now simply want to softly place your CPU within the socket on prime of the pins, and when it’s sitting flat and snugly, you may then shut the metallic lid, pull down the deal with, after which lock it in place.
In case you’re putting in a Socket AM4 CPU, it’s even less complicated. Once more line up the pin 1 triangles on the CPU and socket, and gently place the CPU in its socket. In case you face any resistance, then cease, as you actually don’t wish to injury the pins. It ought to slot easily into place with no resistance. When it’s within the socket, you may then push down the deal with to lock it in place and also you’re finished.

7. Apply thermal paste
You now want to use a brand new layer of thermal goo to your CPU, to make sure that all the warmth it generates goes straight to the contact plate in your CPU cooler.
You may assume that pushing two metallic surfaces collectively can be sufficient, however in actuality neither of those surfaces might be completely flat, and they’re going to even have tiny, microscopic pits that act as insulators. Making use of thermal paste will make sure that each space of your CPU’s heatspreader is related on to your CPU cooler.
In case you’ve by no means utilized thermal paste earlier than, we suggest utilizing a ceramic-paste based mostly for this job, reasonably than a liquid metallic or silver-based paste, as you then don’t want to fret about extra paste inadvertently creating electrical connections elsewhere. I’m utilizing Arctic MX-4 for this information, and I’ve all the time discovered this paste works rather well in my very own builds.

For extra element on this course of, you may learn our full information on apply thermal paste, however as a basic rule, I’ve discovered that making use of a cross form in the midst of the CPU will present an excellent unfold of protection. As soon as your CPU cooler is clamped in place, the strain will unfold the paste evenly over the CPU’s heatspreader. Don’t be tempted to use an excessive amount of right here – simply two easy strains is lots.
In case you’re putting in a Socket AM5 CPU, I additionally suggest putting a Noctua NA-TPG1 paste protect round your CPU, as it will cease it getting caught within the crevices across the edge, making it tough to wash later. This step isn’t important, although.
8. Refit CPU cooler
As soon as your thermal paste is in place, it’s time to refit your CPU cooler. In case you’re utilizing an air cooler, place it so the fan is directing airflow by the heatsink towards the again of the case or, if this isn’t potential, set it in order that it’s directing the airflow to the highest. If it makes use of the usual AMD socket mounts, then you definitely simply have to clip the aspect with out the deal with to one of many plastic lugs, and you may then hook the opposite latch over the opposite clip, and push down the deal with to safe it.
In case you’re refitting an Intel inventory cooler, push down one of many pins so it goes by the outlet within the motherboard, then flip it to lock it in place, repeating this course of with all 4 circles across the cooler.

In case you’re refitting an AIO cooler, or certainly any cooler with a customized backplate, then you definitely now simply have to remount it and put the thumbscrews in place once more. Flip one of many screws part of the way in which, then screw in one other diagonally reverse slightly little bit of the way in which, then do the identical with the ultimate two thumbscrews. Repeat this course of a bit at a time, going between the thumbscrews, till they’re screwed in tight with simply your thumb. Until your guide specifies in any other case, this ought to be sufficient stress to maintain your CPU cool, and also you received’t want a screwdriver to tighten them additional.
Lastly, make sure that your CPU cooler is plugged into the ability header(s) in your motherboard, together with all of the followers in addition to the pump unit should you’re utilizing an AIO cooler. In case your motherboard has a particular AIO cooler header, then plug within the pump unit’s energy connector right here, and hook up the followers to the CPU cooler header. In case you’re utilizing an air cooler, simply plug the followers into the CPU cooler header and also you’ll be good to go.

9. Check your CPU
Lastly, it’s time to ensure your CPU is put in accurately and being saved cool. Boot up your PC, and wait a short time to your motherboard’s BIOS to redetect your CPU – this course of can take an alarmingly very long time on a number of the newest AMD motherboards, however let it do its work, and also you’ll hopefully then be capable of get again into Home windows.
When you’re there, obtain CPU-Z, and run it to ensure your CPU has been accurately detected and is working correctly. Lastly, it’s worthwhile to stress-test your CPU to ensure its temperatures aren’t too excessive. I like to recommend downloading CoreTemp for this job, after which merely working the multi-threaded benchmark stress take a look at in CPU-Z for ten minutes.
Keep watch over the temperature in CoreTemp, and ensure not one of the temperatures go into the hazard zone. Some Intel 14th-gen and Thirteenth-gen CPUs do get extremely popular after they’re being stress-tested, but when they’re hitting 100°C and the clock pace in CPU-Z is dropping like a stone, then you definitely both want a greater CPU cooler, or it’s worthwhile to repeat the steps above to make sure that there’s an honest thermal connection between your CPU and your cooler.
And that brings us to the top of our CPU improve information, you now simply have to benefit from the improved gaming efficiency of your shiny new chip. In case you’re trying to go additional and improve the entire shebang, then take a look at our full information on construct a gaming PC, the place we take you thru the entire course of from begin to end.